We know – what can possibly be more boring than cleaning? Watching paint dry maybe, but we don’t have to worry about that here! Unfortunately, there are no shortcuts; you have to keep cleaning in order to maintain your instrument in its’ optimum condition. Some instruments require less attention than others (pianos, for example, just need to keys dusted and the wood polished from time to time – Henle do a lovely polishing cloth) while wind and brass instruments need far more attention.
Remember, always follow the manufacturer’s advice and if you’re not sure what to do seek advice.
Here are some general tips and guidelines, with links to products you may find helpful. And remember to keep your cleaning products clean – no point in cleaning with a mucky cloth!
Guitars:
We’ve started with guitars simply because there are so many guitarists around, and because they seem to be some of the worst cared for instruments I’ve come across, as anyone who has had to clean a guitar with cobwebs inside the guitar will tell you!
Each time you replace your strings it’s worth cleaning the fretboard with some lemon oil as this will remove any debris (your own skin, usually). Dunlop, Kyser and D’Addario have good offerings. For the wood of the guitar itself, use a guitar polish, but be careful not to overdo it. Axe Wax is one of the best offerings on the market for this. GSH Fast Fret is probably the best way to keep your strings in good condition; I prefer this to products like the Swipe, but this is just personal preference. Dunlop and D’Addario also have a range of maintenance items, with polish, cloths, fretboard conditioner, and string cleaning products all being readily available.
For electric guitars, remember to remove dust and dirt from the pickup with a dry cloth.
Complete kits such as the Ernie Ball Musicians Toolkit or the D’Addario Guitar Maintenance kit are useful but probably more for the professional or very serious amateur. The question you have to ask is are you happy for your expensive instrument to be trusted to a courier and do you trust the luthier who’s doing your maintenance? It can be very cost effective, not to say satisfying, to do this work yourself.
Mandolin:
Generally, treat a mandolin like you would a guitar. BUT, there’s one quite important difference. Check out the pic. Notice that the bridge isn’t square? It shouldn’t be, or at least probably won’t be when you’ve finished with it.
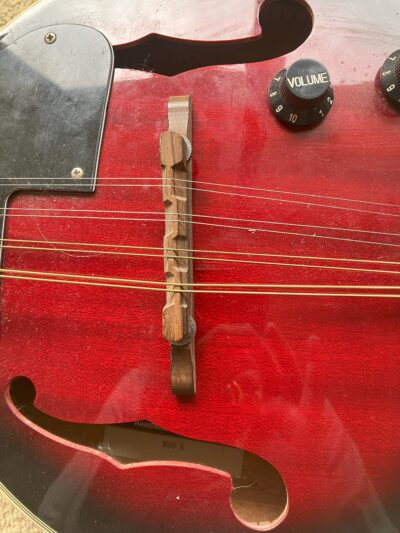
The bridge should, at the D strings be the same distance from the 12th fret as the 12th fret is from the headstock. Or to put that another way, the 12th fret is half way on the strings playing part length. You can check that using harmonics at the 12th fret. it should be the same note. Now if the bridge is at 90 degrees to the strings and you try the harmonics on the E strings you’ll note that the harmonic at the 12th fret is off tune. Move the bridge towards the head until the harmonic and the open string sounds match. Of course this is best done without the strings being at full tension. You’ll need a ruler to make sure the bridge is the correct distance from the 12th fret. 17.5 cms on mine.
Orchestral Strings:
Compared to wind and brass there is much less to be done, mainly because you don’t blow into them, and they are less complicated in their construction. However, there are some useful things to know about.
A soft polishing cloth will keep the body of the instrument in fair condition (Ernie Ball and D’Addario Microfibre cloths are good options), and I would definitely recommend Hill Premium Conservation Wax, which has the added benefit of the most wonderful smell of any cleaning product anywhere!
Over time rosin from the bow will fall onto the instrument. This can be cleaned off with Viol Instrument Cleaner or Hill Varnish Reviver. I’ve tried Hidersol but found it to be a bit thin and not so effective. Lapella string and fingerboard wipes are also useful to keep things in good order.
Pegs can be another thing that need attention, as they can shrink and expand when the weather changes which makes it difficult for you instrument to stay in tune.. There are 2 types of peg paste: one which helps the pegs slip, and one that prevents them from slipping. Hill peg paste help lubricate the pegs and Hidersine Hiderpaste prevents the pegs from slipping. Always use sparingly.
Wind Instruments:
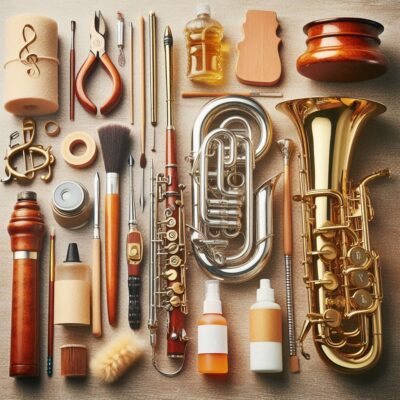
There is a bit more care to be taken with wind instruments due to the nature of moisture in our breath interacting with instrument, especially the pads and cork. Be carefull when taking the instrument apart. It’s not a cracker, so don’t pull your instrument but gently twist the component section apart.
And if you are a parent of a child who plays, try and avoid letting them eating anything sweet before practice – it’s not just their teeth that will rot!
Always clean the inside of your instrument at the end of your practice, lesson or concert, and remember to be careful not to damage the keywork – the repairs can be costly.
I’m also a bit wary of things left in the instrument such as pad savers. In theory these are supposed to absorb any moisture, but they can trap the moisture in the instrument, especially if you leave them in for too long, when what you are trying to do is make sure the inside of the instrument is dry. Making sure the inside of any wind (and brass) instrument is allowed to dry is crucial to keeping your instrument in good repair.
Before you start make sure you have basic cleaning materials; pull-throughs or swabs, mouthpiece brushes, cleaning cloths and pad dryers. You can easily get cheap cleaning wipes and swabs, but I tend to be a bit wary of these.
Flutes:
You will need a flute cleaning rod, a gauze cloth and a microfibre cloth.
Disassemble the flute by taking the head and foot joint off (if in doubt check with the manufacturer or more instructions). As with all wind instruments, avoid putting pressure on the keys and gently twist the parts apart – don’t pull them like a cracker. Clean the inside of the flute with by threading the gauze cloth through the eye of the cleaning rod. Personally, I prefer wood or plastic rods to the metal ones. Wrap the cloth around the rod so it is completely covered and gently insert into the flute and rotate gently so any moisture is removed. Do the foot joint first as this is usually the driest part of the flute. Follow the same process for the main body of the flute taking care to avoid getting the cloth caught in the keys. To clean the head joint, hold the head joint with the embouchure and lip plate are facing you. Be careful not to disturb the tuning cork as the placement of this is quite precise. Push the wrapped cleaning rod into the head joint and, as with the body, gently rotate. When the rod passes the embouchure hole, slow down and stop the moment you feel it has reached the tuning cork. Carefully withdraw the rod, and repeat the process until the head joint is dry. Clean the outside of the polishing cloth, and gently wipe the tenons (the bit where the flute parts join together) so that any grease dirt is removed; even the tiniest speck of grit can cause the joints to become stuck which will almost certainly need a repairer to sort out. Periodically use a silver polishing cloth to give your flute extra shine, but don’t overdo it.
BG Pull throughs are excellent with the A32F for the body of the flute or the A32FG for the body and head joint:
or the A32FK which will do the body and the head joint:
Clarinets:
Carefully disassemble the clarinet (remember to gently twist the parts apart rather than pull them apart). Remove the ligature and the reed, which you can dry by placing on the back of your hand, and which ideally should be stored flat and dry in a reed case, separate the mouthpiece and barrel and wipe the outside with a soft cloth. Clean the inside with a mouthpiece brush. Clean the bore of your clarinet (upper and lower joints and the bell) with a weighted pull through. Work from the bottle of the bell up. These can, on occasion snag on the inside of the keys, so don’t force anything if the cloth gets caught. If it doesn’t free up easily, consult a repairer. Your local music shop, if you have one, will probably be able to help. Use cleaning papers to dry the pads.
Remember to apply cork grease to the cork such as Rico, Champion or Vandoren on the joints as this helps parts of the instrument to ensure a good seal at the joints which prevents air leaking when being played.
Or the Yamaha cleaning kit will give you cork grease, swab, pad papers, a mouthpiece brush, tone hole cleaner, and a small polishing cloth
Saxophones:
Remove the ligature and the reed from the mouthpiece. As with the clarinet, the reed can be dried by placing I on the back of your hand after which it should be stored flat and dry in a reed case). Remove the mouthpiece and clean with a mouthpiece brush. Dry with a soft cleaning cloth. Remove the neck of the saxophone and dry with a suitable pull-through such as the BG A31, which is specially designed for saxophone neck. Clean the main body of the instrument with a specialist weighted pull-through or swab by inserting the pull=through into the bell of the saxophone. Flip the sax around so the rope end of the swab can slide through the body of the instrument. Follow this process 2 or 3 time to make sure all moisture is removed. Before putting the sax back into the case, remember to put the octave key cap protector back in as the octave key can easily be bent out of alignment.
Swabs and Pull Throughs:
Saxophone Pad dryers:
Oboes:
As with clarinets and saxophones, remove the reed and dry before placing them in a reed case.
Drop a weighted oboe pull-through into the bell of the instrument to clean the pipe.
Wipe the outside of the instrument with a silk cloth or a polishing clothe, and remove any moisture from the pads.
Brass Instruments

Before you start you will need an appropriate valve oil, or lubricant, mouth piece brush and appropriate snake. Valves should be lubricated with valve oil, and mouthpieces cleaned with a mouthpiece brush, and the body of the instrument with a specialist trumpet, trombone or French horn snake.
A soft cloth should be used on the outside of the instrument. A good quality glass cleaner can be used to remove grime and fingerprints, and a silver polishing cloth to maintain the shine.
Brass instruments should be given a monthly wash with soapy, lukewarm water followed with a cold water rinse. Allow to dry before putting the instrument back in the case.
Trumpets:
Carefully remove the mouthpiece slides and valves – keep the valve caps and felt pieces to one side so they don’t get wet. Submerge the instrument in soapy, lukewarm water, and clean the inside of the instrument with the snake brush. (Note to reader; under no circumstances use a live snake. That would be dangerous to the snake, to you, and you would almost certainly get a visit from an animal protection officer). Rinse in cold water and allow to dry.
Clean the bottom halves of the valves with soapy water and a soft cloth. Take care to keep the felt or cork bits dry. Rinse with clean water. Once your instrument is completely dry re-grease the slide and re-oil the valves. In general, the valves should be oiled daily and the slides once a week or so.
Trombones:
Disassemble the trombone by separating the mouthpiece, tuning slide and bell.
The slide and bell should be wiped down after each use, and the slide oiled regularly to ensure smooth movement.
As with trumpets, wash with lukewarm soapy water, and soak for about 15 minutes Clean the inside with a trombone snake brush, rinse with clean water and allow to dry. Clean the mouthpiece from and allow to dry. Apply a slide cream or lubricant to the slide.
Percussion:
Make sure anything made of wood is polished and avoid using strong chemicals on anything metallic, such as cymbals. Avoid using anything abrasive and keep soft polishing and microfibre cloths to hand. For drum heads, remove the hoops and heads, wipe the top and bottom of the bearing edge, and clean the shell. Lubricate the pedals, and periodically check the tension rods and wing nuts to make sure they are in good working order.
Meinl does an extensive range of cleaning products (and very good quality accessories in general), and Zildjian and Dunlop have good quality polishes.
And finally….
Lastly, there’s a couple of things you should do to keep your instrument in good nick. When you’ve stopped using it, cover it. Put a dust sheet over it, or for non-digital pianos, close the lid. If you don’t have an instrument stand please, don’t leave the case lid shut or in the gig bag zipped up. There’s a reason those cases get shipped with a silica gel or crystals in them. They absorb moisture and that can damage your instrument, the finish, the wood and the pegs. If you play brass or woodwind, well I wouldn’t want to think what could happen to your valves, slides or other mechanisms. as for your reeds/strings/rosin….
I hope I don’t need to draw pictures*, because I won’t be able to sleep at nights.

This, from Salvador Dali, may give you some idea, and if that doesn’t work check out some of Hieronymus Bosch.
- because my drawing is worse than my singing voice, and that’s classified as an offensive weapon.

